Quick post, because I'm about to board a flight to RDU at Phoenix Sky Harbor. Pat Shanahan of the Arizona Republic has a nice package of panos from the Arizona-Mexico border.
Take a look: http://www.azcentral.com/flash/borderfence360/borderfence360_index.html
I'll post more later... I had a nice chat/impromptu pano seminar with Pat and Dave Seibert from the Republic this week, and I can tell you more about how the project came about.
Thursday, November 13, 2008
Saturday, October 25, 2008
Calling All Panoramists
I'm wondering how many of you are regularly publishing panoramas on your publication's website.
If you are - tell me. I want to feature the work you all are doing. Don't be shy.
Post a reply, or email me!
Thursday, September 18, 2008
Meet My Friend Bo

I've been working with a new panorama tool this past month or so, and I'm liking it a lot.
It's the Bo Bracket, a simple, light, accurate panorama bracket made by Bo Lorentzen, a photographer and computer graphics artist. The bracket is made of model aircraft birch plywood, cut with a precision laser and laminated.
The bracket is designed for specific lenses. I ordered mine to fit my Sigma 8mm f/4 fisheye. It's also available for the Sigma 8mm f/3.5, the AF Fisheye-Nikkor 10.5mm f/2.8, and several point-and-shoot fisheyes.
Its construction is simple - the base with 3/8" tripod mount socket, the lens bracket, and a long screw with wingnut to hold it all together. It clamps around the lens, allowing it to be rotated around its no-parallax point (NPP), or "nodal point".
Bo recommends using a Manfrotto 259B tripod extension column as a rotator, since the base of his bracket is too small to allow attachment to a regular size tripod head.
I'm using mine atop a short metal post that originally was part of a Forscher Polaroid back for a 35mm film SLR. (Moral of this story - never throw any piece of photo gear away, no matter how obsolete).
The post and Bo Bracket go atop a monopod, and I rotate that, being careful to keep it as vertical as possible. This is very similar to how I used the Nodal Ninja 3 on the campaign trail earlier in 2008. It's very helpful to use a hot-shoe two-axis bubble level
or a surveyor's rod level to keep the monopod vertical.
 I use the monopod from both ground level and holding the monopod up as high as I can. In the picture at left, I'm using my credential holder to hold up the monopod. A flag holder like you might see in a parade would work very well for this. And of course, you'll need a wired remote release.
There are a couple of things to be aware of. In my early testing, I was using the bracket with a Nikon D200. The overhang of the D200's prism cover contacts the bracket, but I was able to turn the lens 90 degrees and mount the camera. Depending on the camera model, this may prevent getting the lens fully into the bracket, thus missing the NPP.
Also, the instructions included with the bracket caution that it's very sensitive to moisture. It's recommended to coat it with epoxy if it's going to be used in wet environments.
The one thing the bracket can't do is to swing up and down to shoot zenith and nadir precisely from the NPP. In the tests I shot (not shooting up or down, but just around), the zenith hole was minimal and could easily be patched by editing the top cube face. The footprint of the bracket is quite small, making a nadir patch easier. The nadir can be shot handheld away from the NPP if necessary. PTGui's viewpoint correction feature makes stitching these off-NPP images much easier.

I put the rig to the test this past weekend at the new zMax Dragway @ Concord. Check out the three panoramas on this page of Thatsracin.com, our motorsports website. These panos were all shot with the Nikon D700 full-frame sensor camera and my trusty Sigma 8mm f/4 fisheye. I've wanted the three-frame advantage of a full circular image, and I wasn't disappointed. I'll post my impressions of shooting and stitching circular images in the next few days.
Tuesday, September 9, 2008
Way Useful Lens Database
Thanks to Nhat V Meyer of the San Jose Mercury News for posting (via the NewspaperVideo Yahoo group) a link to VRWave.com. It looks like the site is under construction, but it's already worthy due to its excellent list of lenses (Canon, Nikon, etc.) and their specifications for panoramic use.
Not only do we use fisheyes for panoramas, we can also use conventional lenses (both prime and zoom). And, we don't have to shoot full 360x180 panoramas - partial cylindrical panoramas can work quite well for story telling especially if you need a really wide view. If you remember the Widelux or Horizon panoramic film cameras, these panoramas will remind you of that"bananarama" effect. Here's an example I shot earlier this year where I needed to have both the building we were reporting on and the skyline. Another advantage of cylindrical panos is they're easier to publish in print - you don't have the extreme distortion at the top and bottom of the images as in equirectangular projections.
The database includes Field of View parameters for these lenses, and (this is the best part) it tells you how to set up a multi-row panorama. The key info is: pitch in degrees for each row, number of rows, and number of images per row. This is key information if you're going to stitch a multi-row, high-resolution panorama for posting to gigapan.org (see an earlier post for details). PTGui handles these multi-row panoramas quite nicely.
Monday, September 8, 2008
Damn Near Perfect
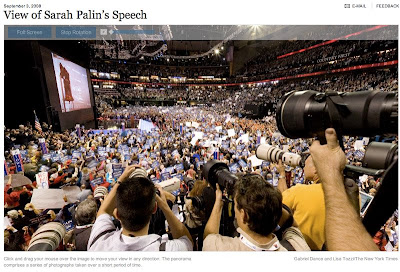
Back from Beijing, Gabriel Dance of nyt.com puts the viewer there during Sarah Palin's speech at the Republican National Convention. I was struck by this pano in that I can't find a single stitching error anywhere, which is impressive given the situation and subject matter.
I asked Gabriel about the shoot and his gear. Here's his response, which sums up the difficulties of making panos in these situations:
Camera: 5D, 15mm fisheye lens
Rig: ballhead tripod, nodal ninja 5
Stitching: PTGUI Pro
"The most difficult thing about these shots is getting them (which
sounds obvious), but really in these types of situations, as you well
know, all the photogs are trying to get their shots and it's a
balancing act between getting the pano, and not getting shanked by an
angry photog's monopod after blocking their shot. And the space is at
a premium as you can tell from the pano. For this one I was on the
stage left cut-stand and I made sure to get their a good hour before
the shot. Shake hands with the other photographers and let them know
what I'm doing. Let them know that I'll keep my tripod tight and in
my spot. Then, when the time is right, hit the shots as quickly as I
can, making sure not to push/move/lean on the tripod.
And hope for the best...
Then it's some Photoshop, just a little bit of layer blending is
sometimes necessary in case anybody is obviously cut in half, and then
we're done. With these speed is essential. I had this up a lil over
an hour after it was shot."
The embedded audio (recorded by Lisa Tozzi) is an excellent addition.
Saturday, August 9, 2008
Big-Time, Big-Event Pano
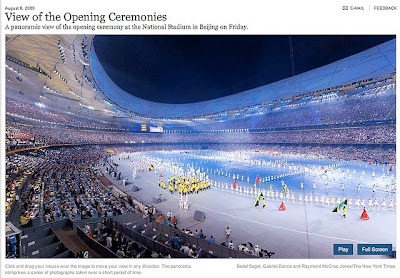
Multimedia producers Bedel Saget, Gabriel Dance and Raymond McCrea Jones of the New York Times website created a fine panorama of the parade of athletes in the opening ceremonies of the Beijing Olympics. These guys have come a long way from where they started. Practice makes perfect. I'm hoping we see a number of panos from this team over the next couple of weeks. I suspect they have something very cool up their collective sleeve!
Sunday, March 9, 2008
Introduction to Panoramas on digitalartwork.net

A great resource for multimedia journalists is digitalartwork.net, the site of the multi-talented Zach Wise. He is a multimedia producer at the Las Vegas Sun who I met at the 2007 NPPA Multimedia Immersion in Portland, OR. He's also a great teacher.
As part of his multimedia work, he shoots 3-shot panoramas with a Sigma 8mm and a Canon 5D. This is a great setup for photojournalists because it's fast, enabling the capture of dynamic scenes. There's sufficient overlap between frames to allow for subject movement in those areas.
Zach has put together a very cool demo that shows the overlap between frames. What happens in those areas between frames is crucial to the success of our panoramas.
The lasvegassun.com website features a link to Zach's panoramas (including one from last week's NASCAR race) and the staff's multimedia on its home page. I'm very envious.
PTGui for Beginners from John Houghton
John Houghton has written several excellent tutorials on his site. His PTGui for Beginners is as good a tutorial as I have found for using PTGui in its Basic mode. It's written for Windows users, but if you're using a Mac, the information about PTGui is nearly identical.
If you've been trying PTGui and are getting frustrated, grab a set of pano images (John provides the set of images used in the tutorial), set aside a couple of hours and go through this tutorial - slowly.
A couple things:
The trial version of PTGui will work just fine for this tutorial.
At first, I would recommend ignoring the part about Smartblend, as the blender built into PTGui will work just fine.
Under the header "Viewing the Stitched Panorama", Mac users can also use Cubic Converter, as well as Pano2VR to convert the equirectangular image into a QTVR file.
Sunday, January 27, 2008
Panoramas from the trail
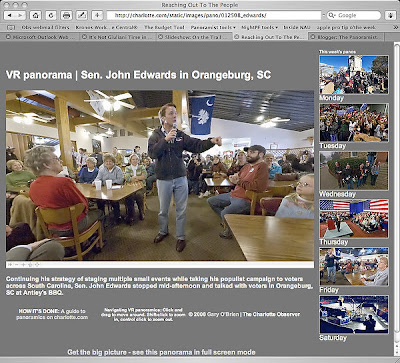
I have been on the road this week in South Carolina with the Democratic candidates. My primary mission was to shoot stills for the paper and online slideshows. We have been running a daily slideshow on the politics page on charlotte.com.
Of course, I also wanted to shoot panoramas!
The rig I used is simple: Sigma 8mm, Nikon D70s, hardwire shutter release, Nodal Ninja 3 head, tall monopod. I keep the strap on the camera and with the monopod retracted, it fits over my shoulder, just like having a third still body. One pano (Monday MLK rally) was handheld, holding the camera high above my head. You can see my shadow in the image.
This lens and camera combo provides enough overlap to allow shooting just four frames in each situation.
When in the buffer at campaign events, I'd kneel and extend the monopod fully. Drawing it as close as possible to me, I'd visually select a spot on the ceiling and try to keep the monopod aligned with that spot as I rotated it 90 degrees for each frame.
In other situations, I'd either stand behind the camera and move along with its rotation, or put the monpod on top of something firm (riser, rope-line stand, abandoned TV tripod). The problem with standing behind the camera and moving with it is that you need quite a bit of floor space, which is at a premium in these situations.
I learned several things.
First, if you're using this rig above your head, don't look up! Your face will be in the nadir of the pano.
Second, practice this at home! If the situation is moving, you have to be quick. Looking at my EXIF data, I was shooting a frame a second in some situations. Click-rotate-click-rotate, all the time trying to keep the monopod relatively vertical.
Third, shoot lots of images. It's very hard to look behind you while keeping the monopod vertical, so you have no idea what's going on back there.
Stitching was helped immensely by setting vertical control points in each frame. This allows PTGui to compensate for variations in the verticality of the monopod between images. In the Control Point window, have the same frame in both panes. Look for vertical lines (door frames, walls, etc., something architectural). Place a point on one end of the line the left pane, then a point on the other end of the line in the right pane. Try to set at least two in each frame, then let PTGui generate control points for the overlapping frames.
Stitching also was helped by adding control points manually in the nadir and zenith regions of each overlapping image pair.
There will be large errors in your initial optimization. I first optimize with no parameters (FoV, a, b, c) selected. Delete the worst of the control points (CPs). I try to visualize the control points as a fever chart. If there's a big drop, I'll delete the points above the drop.
Then select FoV and re-optimize. Delete bad CPs, add the b parameter and reoptimize. Repeat for c, then a. It's surprising how few CPs are needed in the end to optimize.
As you can see, a couple of the final panos have their fields of view restricted. Since I'm not shooting nadir and zenith on these images for the most part, there are unretrievable stitching errors in the polar regions, which often don't contain much content.
What would I do differently the next time?
I'd get a more substantial remote release. I had a cheap one for the D70s which broke, forcing me to switch to another camera (D200) with poor performance in high ISO (Saturday Obama finale).
The holder that flag bearers use would be a useful addition for my belt. I could put the monopod in that and use myself as an extender.
I'd get a full-frame camera to allow greater overlap between frames, plus I could possibly shoot only three frames which would make shooting action easier. Anyone want to loan me a D3?
I hope this is enough info to help you try getting off the sticks and shoot more dynamic subjects. Questions? Just ask.
NOTE: this post updated 9 August 2008 to change links to reflect change in the Charlotte Observer site domain name.
Sunday, January 13, 2008
In the Bathtub with NYT
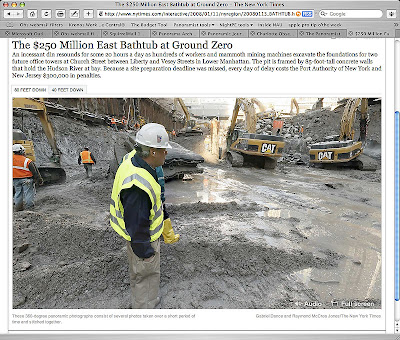
The latest from the New York Times team of Ray Jones and Gabriel Dance. This time, they take us to two levels in the big hole at Ground Zero to take a look at the construction going on in lower Manhattan. The ambient sound is a good touch. Zoom navigation is a bit different here - they've opted to use a right-click (or control-click) submenu to control zoom, rather than keyboard+click shortcuts. I've asked Ray about the tripod being left in the image. As soon as he replies, I'll update. And I will post a nadir patch tutorial as soon as I can.
UPDATE: This from Ray via email: "Well, the tripod thing is something we'll do better next time. I didn't shoot any handheld nadir shots, and that was my fault. And I didn't feel comfortable just trying to clone the tripod away. So we felt it was best to just leave it. I think we're improving each time and it will take us a few more times probably before we nail everything. "
This project was the lead tout on the nyt.com site for awhile over the weekend. That'll bring panoramas to the attention of more viewsers.
I find it useful in this kind of situation - deep shadowed areas and bright sky - to use a Photoshop action called HDR for Dummies written by famed panographer Jook Leung. (You've seen his Times Square at New Year's Eve panos).
Rather than bracket exposures (and risk lots of subject movement), I acquire two tiff files from each RAW image, one adjusted for shadows, one adjusted for highlights. The HDR action blends the two, allowing for a longer dynamic range. Kind of reminds me of split-filter printing on variable-contrast paper, back in the b/w darkroom days.
Your views on using this kind of blending in photojournalism? Discuss. Please feel free to add to the comments.
Wednesday, January 2, 2008
Happy New Year!
OK, let's get back to work!
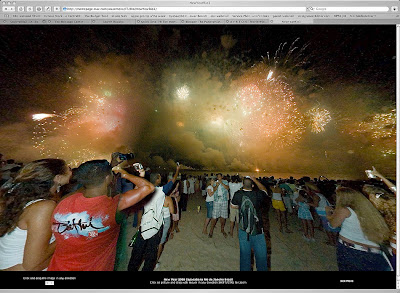
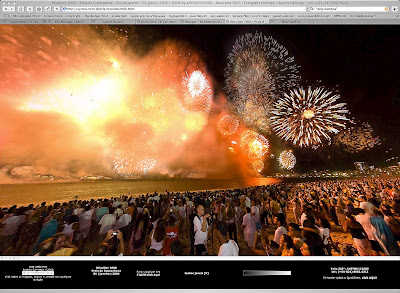
To kick off the new year, here are a couple of panoramas from New Year's Eve in Rio de Janiero. I found these on the PanotoolsNG Yahoo group.
 Willy Kamena
 Ayrton Carmago
Willy Kamena of Bremen, Germany was visiting Ayrton Camargo of Rio de Janiero, and the two went to the beach for the New Year's Eve fireworks. You can see both Ayrton and Willy at work in these two images.
Note they are both using fill flash (absolutely necessary in this situation), Ayrton's fill balance is just about perfect with the light provided by the fireworks. A reader on the Panotools NG group asked him about his flash rig, here's what he had to say: "I use the Gary Fong diffuser, always pointing to the sky. Doesnt matter where I'm (at) if there's a ceiling or not! And I put the flash NOT on TTL. Always use on A (automatic)."
Ayrton is using a pole rig to get his camera up higher. Willy is using a monopod, but at eye level.
Also note the use of simple ambient sounds embedded in the full-screen html. I think this adds to the "being there" effect.
Why are these panos cool? These photographers are using the techniques we need to shoot photojournalistic panoramas. They're traveling fast and light, using monopods and poles rather than tripods. They're using fill flash to reveal content in areas where there is nothing but darkness. And they're working under difficult lighting conditions with moving subjects.
To kick off the new year, here are a couple of panoramas from New Year's Eve in Rio de Janiero. I found these on the PanotoolsNG Yahoo group.
 Willy KamenaAyrton Carmago
Willy Kamena of Bremen, Germany was visiting Ayrton Camargo of Rio de Janiero, and the two went to the beach for the New Year's Eve fireworks. You can see both Ayrton and Willy at work in these two images.
Note they are both using fill flash (absolutely necessary in this situation), Ayrton's fill balance is just about perfect with the light provided by the fireworks. A reader on the Panotools NG group asked him about his flash rig, here's what he had to say: "I use the Gary Fong diffuser, always pointing to the sky. Doesnt matter where I'm (at) if there's a ceiling or not! And I put the flash NOT on TTL. Always use on A (automatic)."
Ayrton is using a pole rig to get his camera up higher. Willy is using a monopod, but at eye level.
Also note the use of simple ambient sounds embedded in the full-screen html. I think this adds to the "being there" effect.
Why are these panos cool? These photographers are using the techniques we need to shoot photojournalistic panoramas. They're traveling fast and light, using monopods and poles rather than tripods. They're using fill flash to reveal content in areas where there is nothing but darkness. And they're working under difficult lighting conditions with moving subjects.
Subscribe to:
Posts (Atom)
